
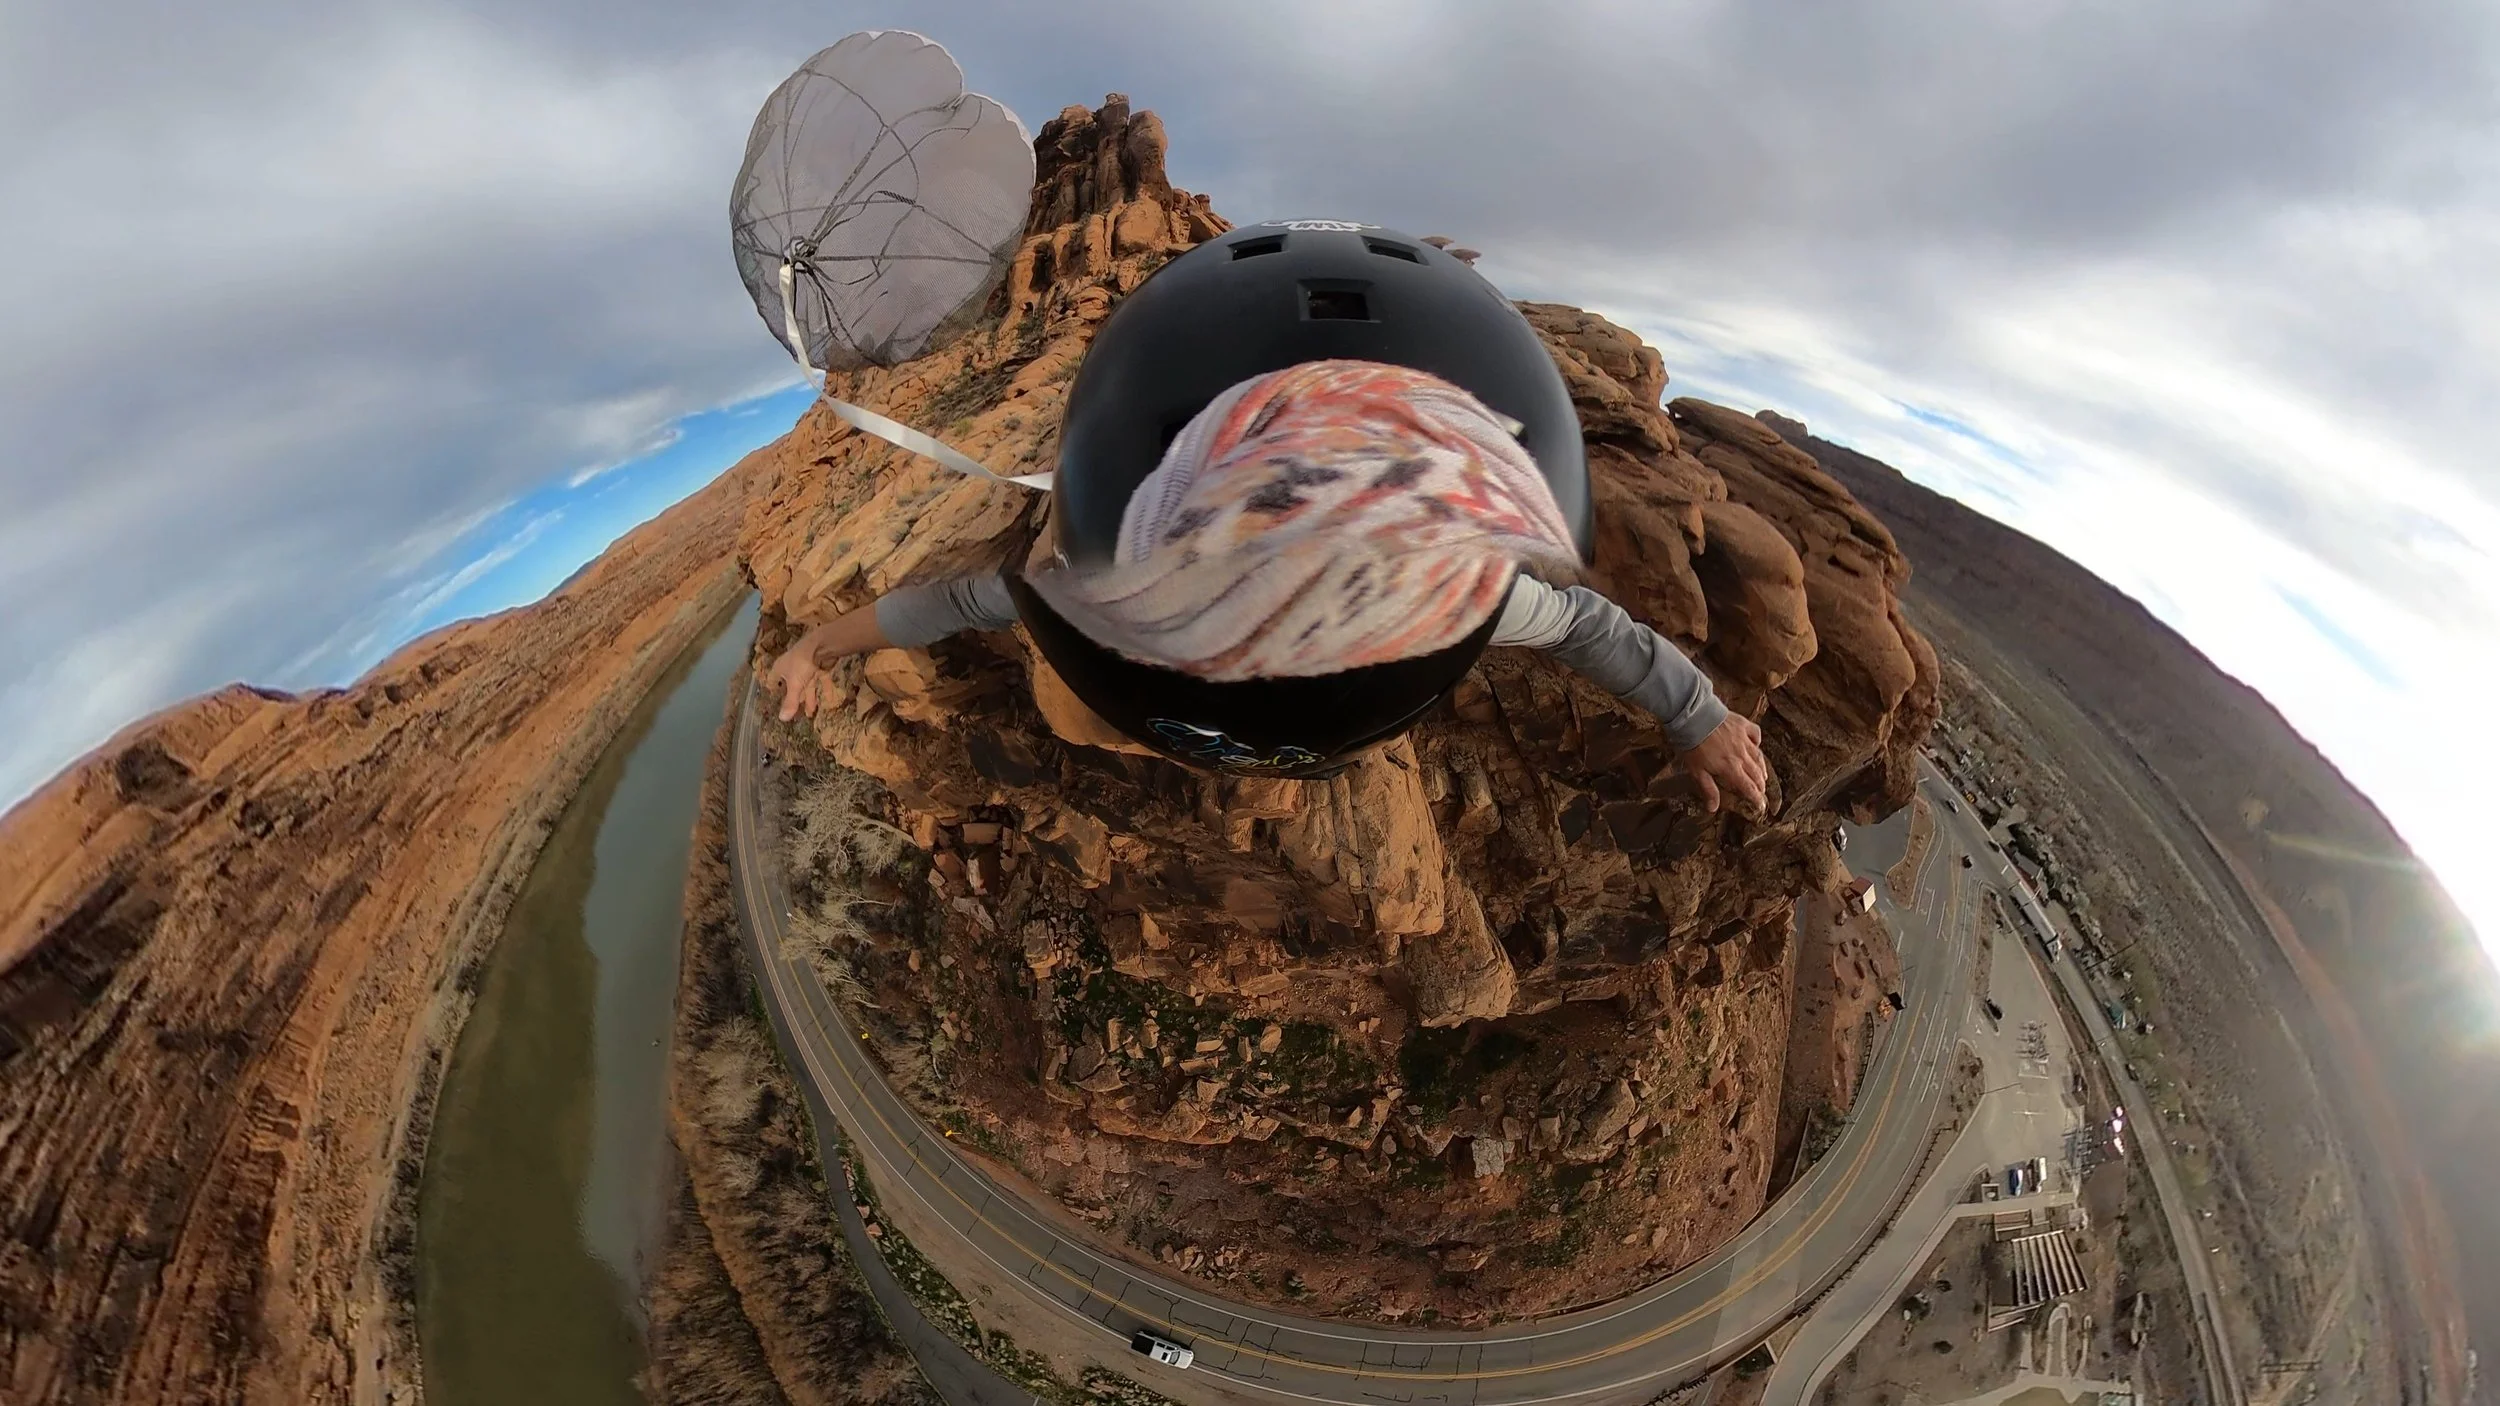
Low Free Fall
with Ryan Shute
Editor’s Note:
As with all guest contributions, the perspectives shared here are those of the author and are intended to provide context and insight, not prescriptive guidance. Individual judgment and experience will always play a critical role.
Low free fall is one niche of BASE that sits further out on the margin and requires a high level of experience, judgment, and specialized understanding. This article aims to lay out some of that foundation.
Alright, let's get the obvious part out of the way real quick. Low free fall can be a blast with the proper training, setup and conditions. Once you start free falling exits under 200’, the time for pilot chute hesitations, off-heading corrections, body position adjustments or any other jumper or rigging error is significantly reduced. Most people find it reckless, unsustainable and unnecessary. They aren't entirely wrong, there are plenty of ways to enjoy BASE while giving yourself as much margin as possible. If you feel drawn to low free fall, the information here is what has worked for me and the reasons why I believe it has worked.
I am not claiming any of this information to be fact as low free fall is still evolving and there is still a lot to be learned. Take your time and enjoy the process, the low jumps aren't going anywhere and we can ALWAYS use more time to improve as jumpers and canopy pilots. In no way, shape or form is this information meant to teach you low free fall technique, nor am I encouraging you to go figure it out on your own. No amount of articles, videos or spreadsheets can replace a mentor and proper in-person guidance and instruction.
Preparation
Before you start cutting out margin and pushing low jumps, it's a great idea to be dialed and proficient on jumps that are a bit more forgiving. I’m not going to state a number of jumps or years you should have because there is no “right” answer to this.
You SHOULD have solid, consistent body positioning on exit, the ability to make adjustments to your body position when necessary, clean and symmetrical packing, great heading performance, brake settings and control line length properly adjusted, well paced runners and a solid push.
A slightly head high exit is what we want to be going for here. Too head low means harder openings as well as a more aggressive swing surge. This can impact our time to toggles and cause us to lose valuable altitude.
Your time to toggles should be under a second on every jump and inputs on your canopy as close to second nature as possible. The closer your canopy feels to an extension of your body, the better.
A Flysight will be one of your most valuable tools when training for low free fall. Data such as forward and vertical speed under canopy in full flight, half brakes, near stall, at a stall, etc. are all very valuable information to begin with, even more so when you are opening low to the ground.
As you begin to train for low free fall, ideally testing new techniques and gear on large exits at first, noticing the differences that certain pitch methods, packing methods, pilot chutes, bridal lengths, canopies and containers can have on your opening height will be difficult without a Flysight unless drastic.
Louis Harwood of the UK developed an app that takes all the data from your Flysight and directly calculates linestretch, inflation, 1:1 glide and density altitude, eliminating the need to sync up videos and graphs which honestly grew quite tiresome. Huge shoutout to Louis for this one, he made it way easier to interpret Flysight data for low free fall! This is linked at the bottom of the article for those interested.
Gear Selection + Rigging
Over the last 2 or so years I have tested lots of different setups in a low free fall environment in Moab, Utah. Everything listed here is what I have found to work best in this climate and elevation at my body weight. This is where testing your setups on bigger exits first becomes important. Just because a certain system has proven successful for one person in one location, doesn't always mean the same will be true for a different person in a different location. Use a Flysight, get your systems dialed in and get consistent data before you push it low.
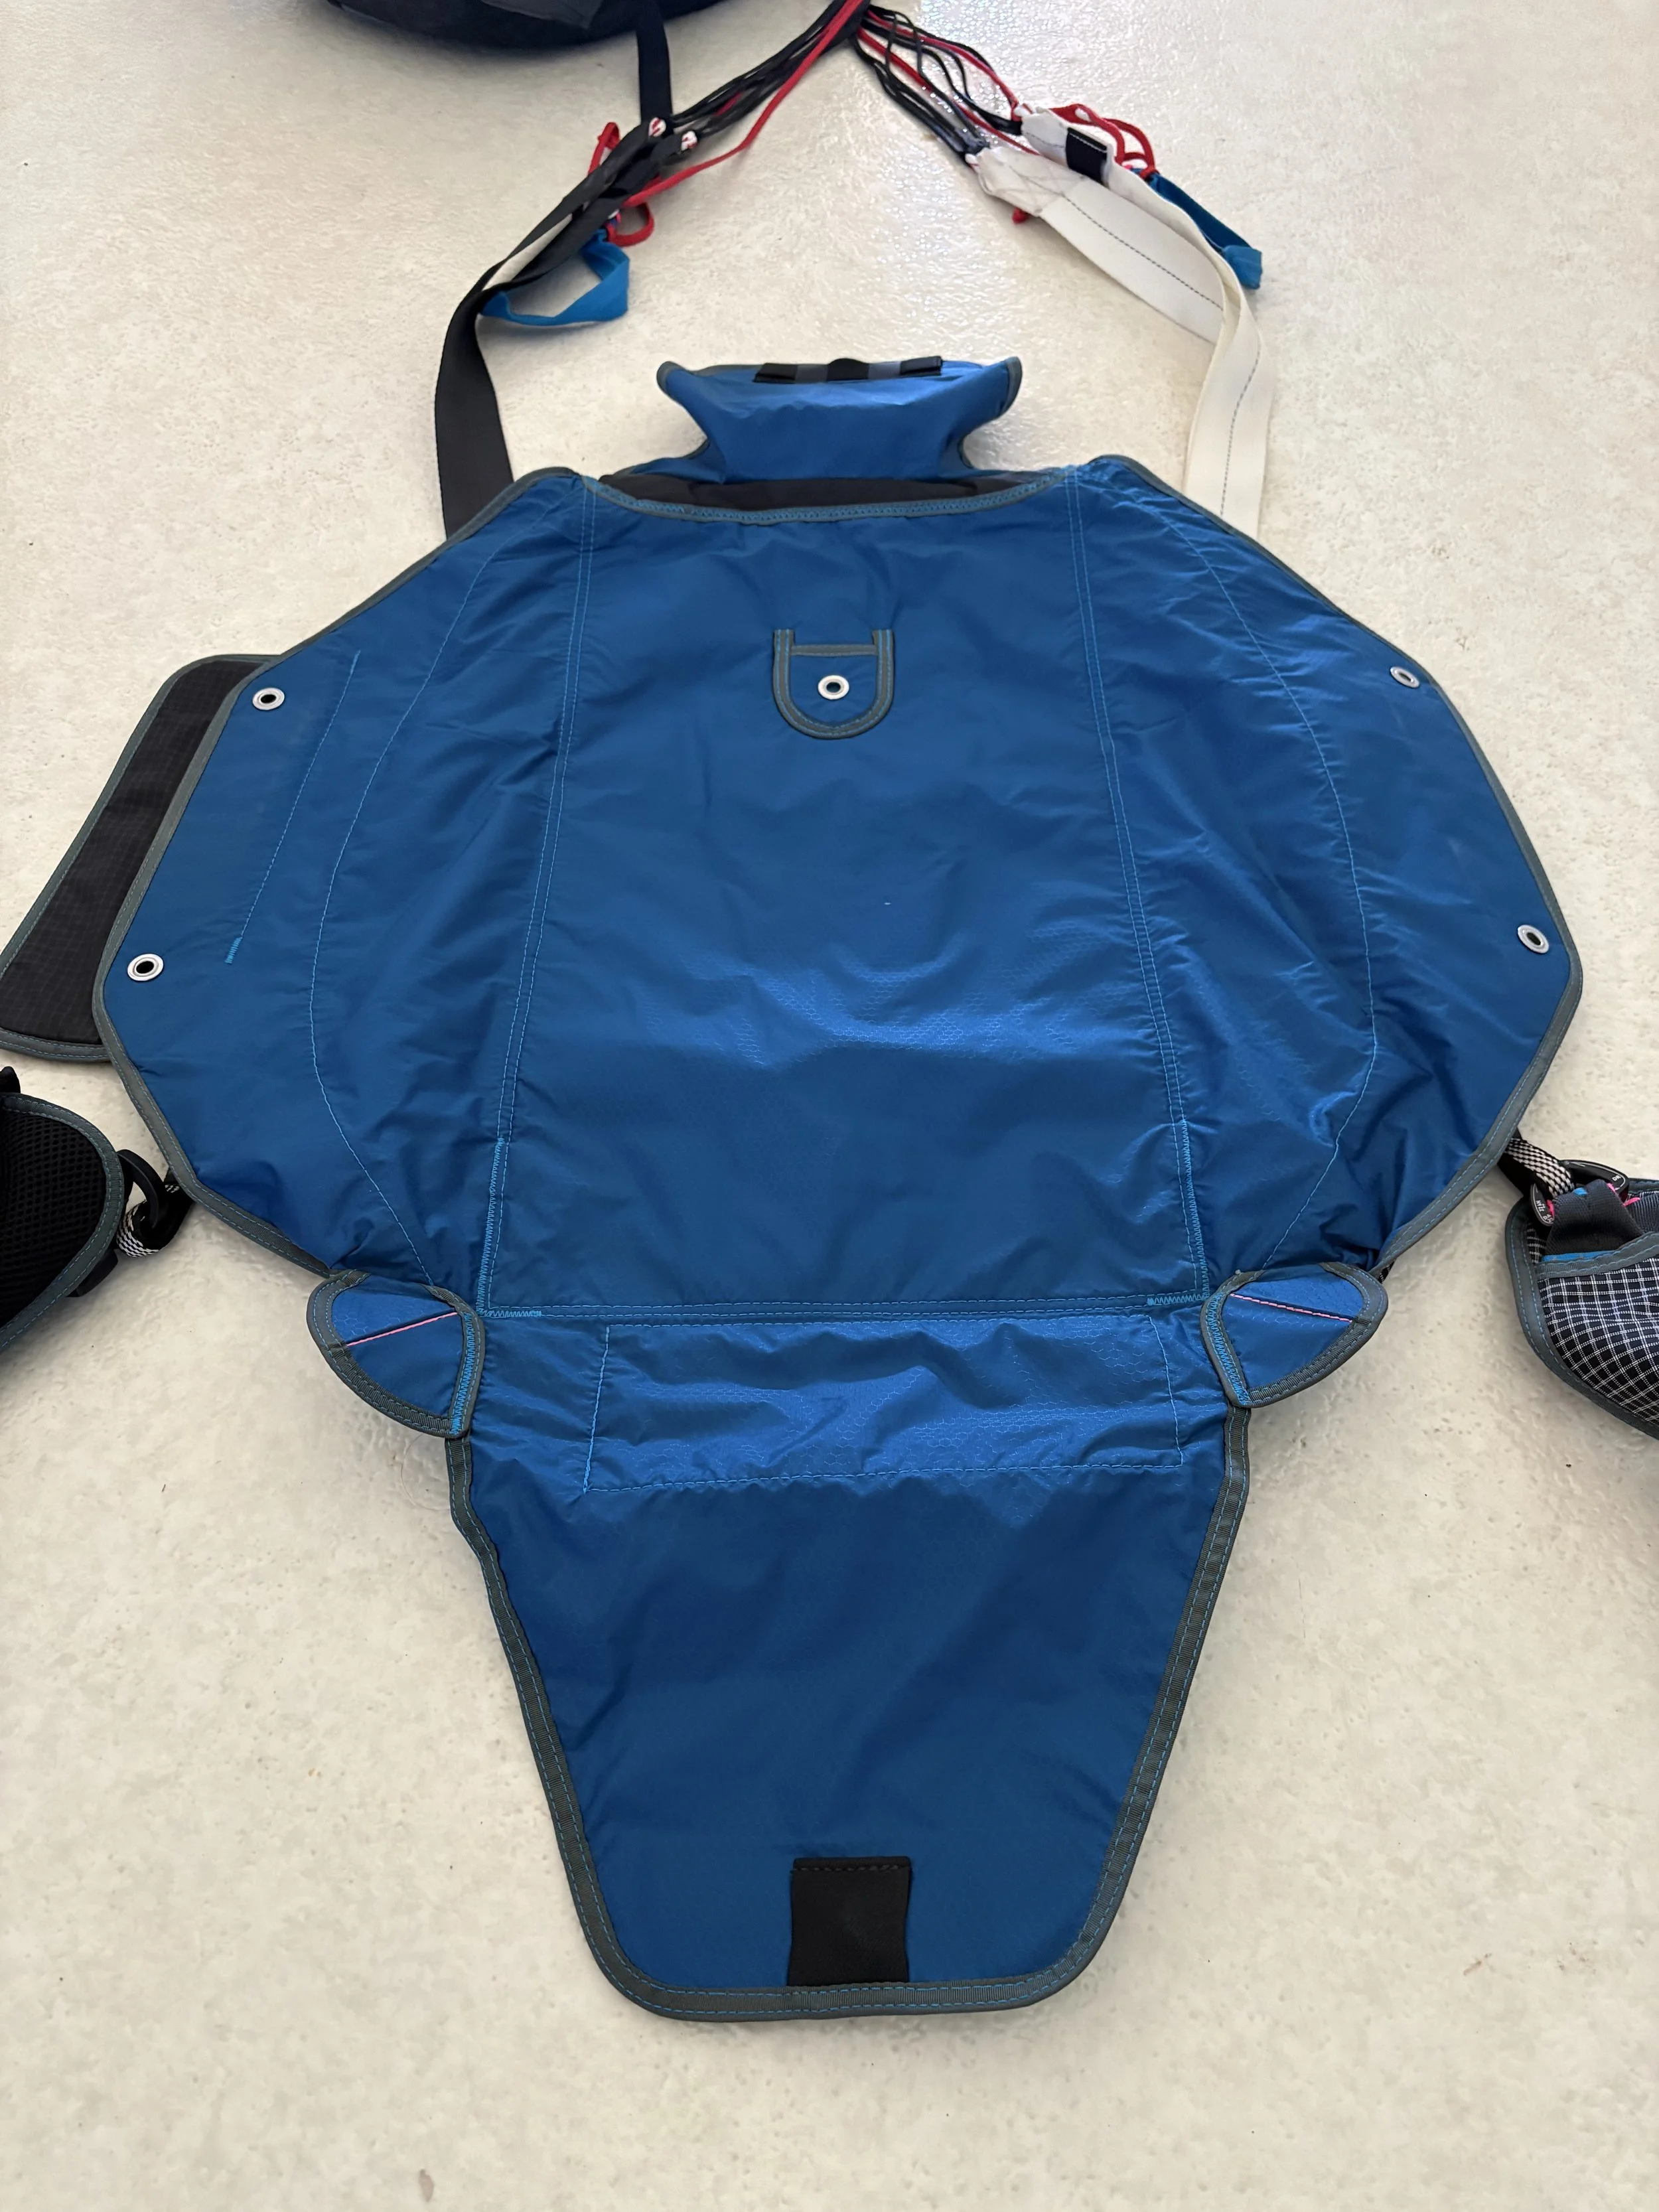
The first thing I'd like to address in this section is weight. When we are jumping low exits, we want to make the job of our pilot chute as effortless as possible. The faster our pilot chute can extract our canopy to linestretch and begin inflation, the higher we open and the more time we have. This starts with ultralight gear. The lighter the container, the easier our flaps flip open and allow a clean extraction. The lighter the canopy, the quicker it’s pulled to linestretch with the least amount of resistance on the pilot chute, so on and so forth. I’ve gone so far here as to opt for white fabric on a lot of my pilot chutes and canopies due to it lacking dye and being the lighter material. While they are pretty much standard these days, I believe cornerless containers are also a must. When possible we want to remove anything we can that can slow down our extraction process. The Blacksheep Talus 2 is currently my favorite container for low jumps. It’s comfortable, crazy light and has huge cornerless flaps that allow the container to open nice and flat. (Figure 1:1)
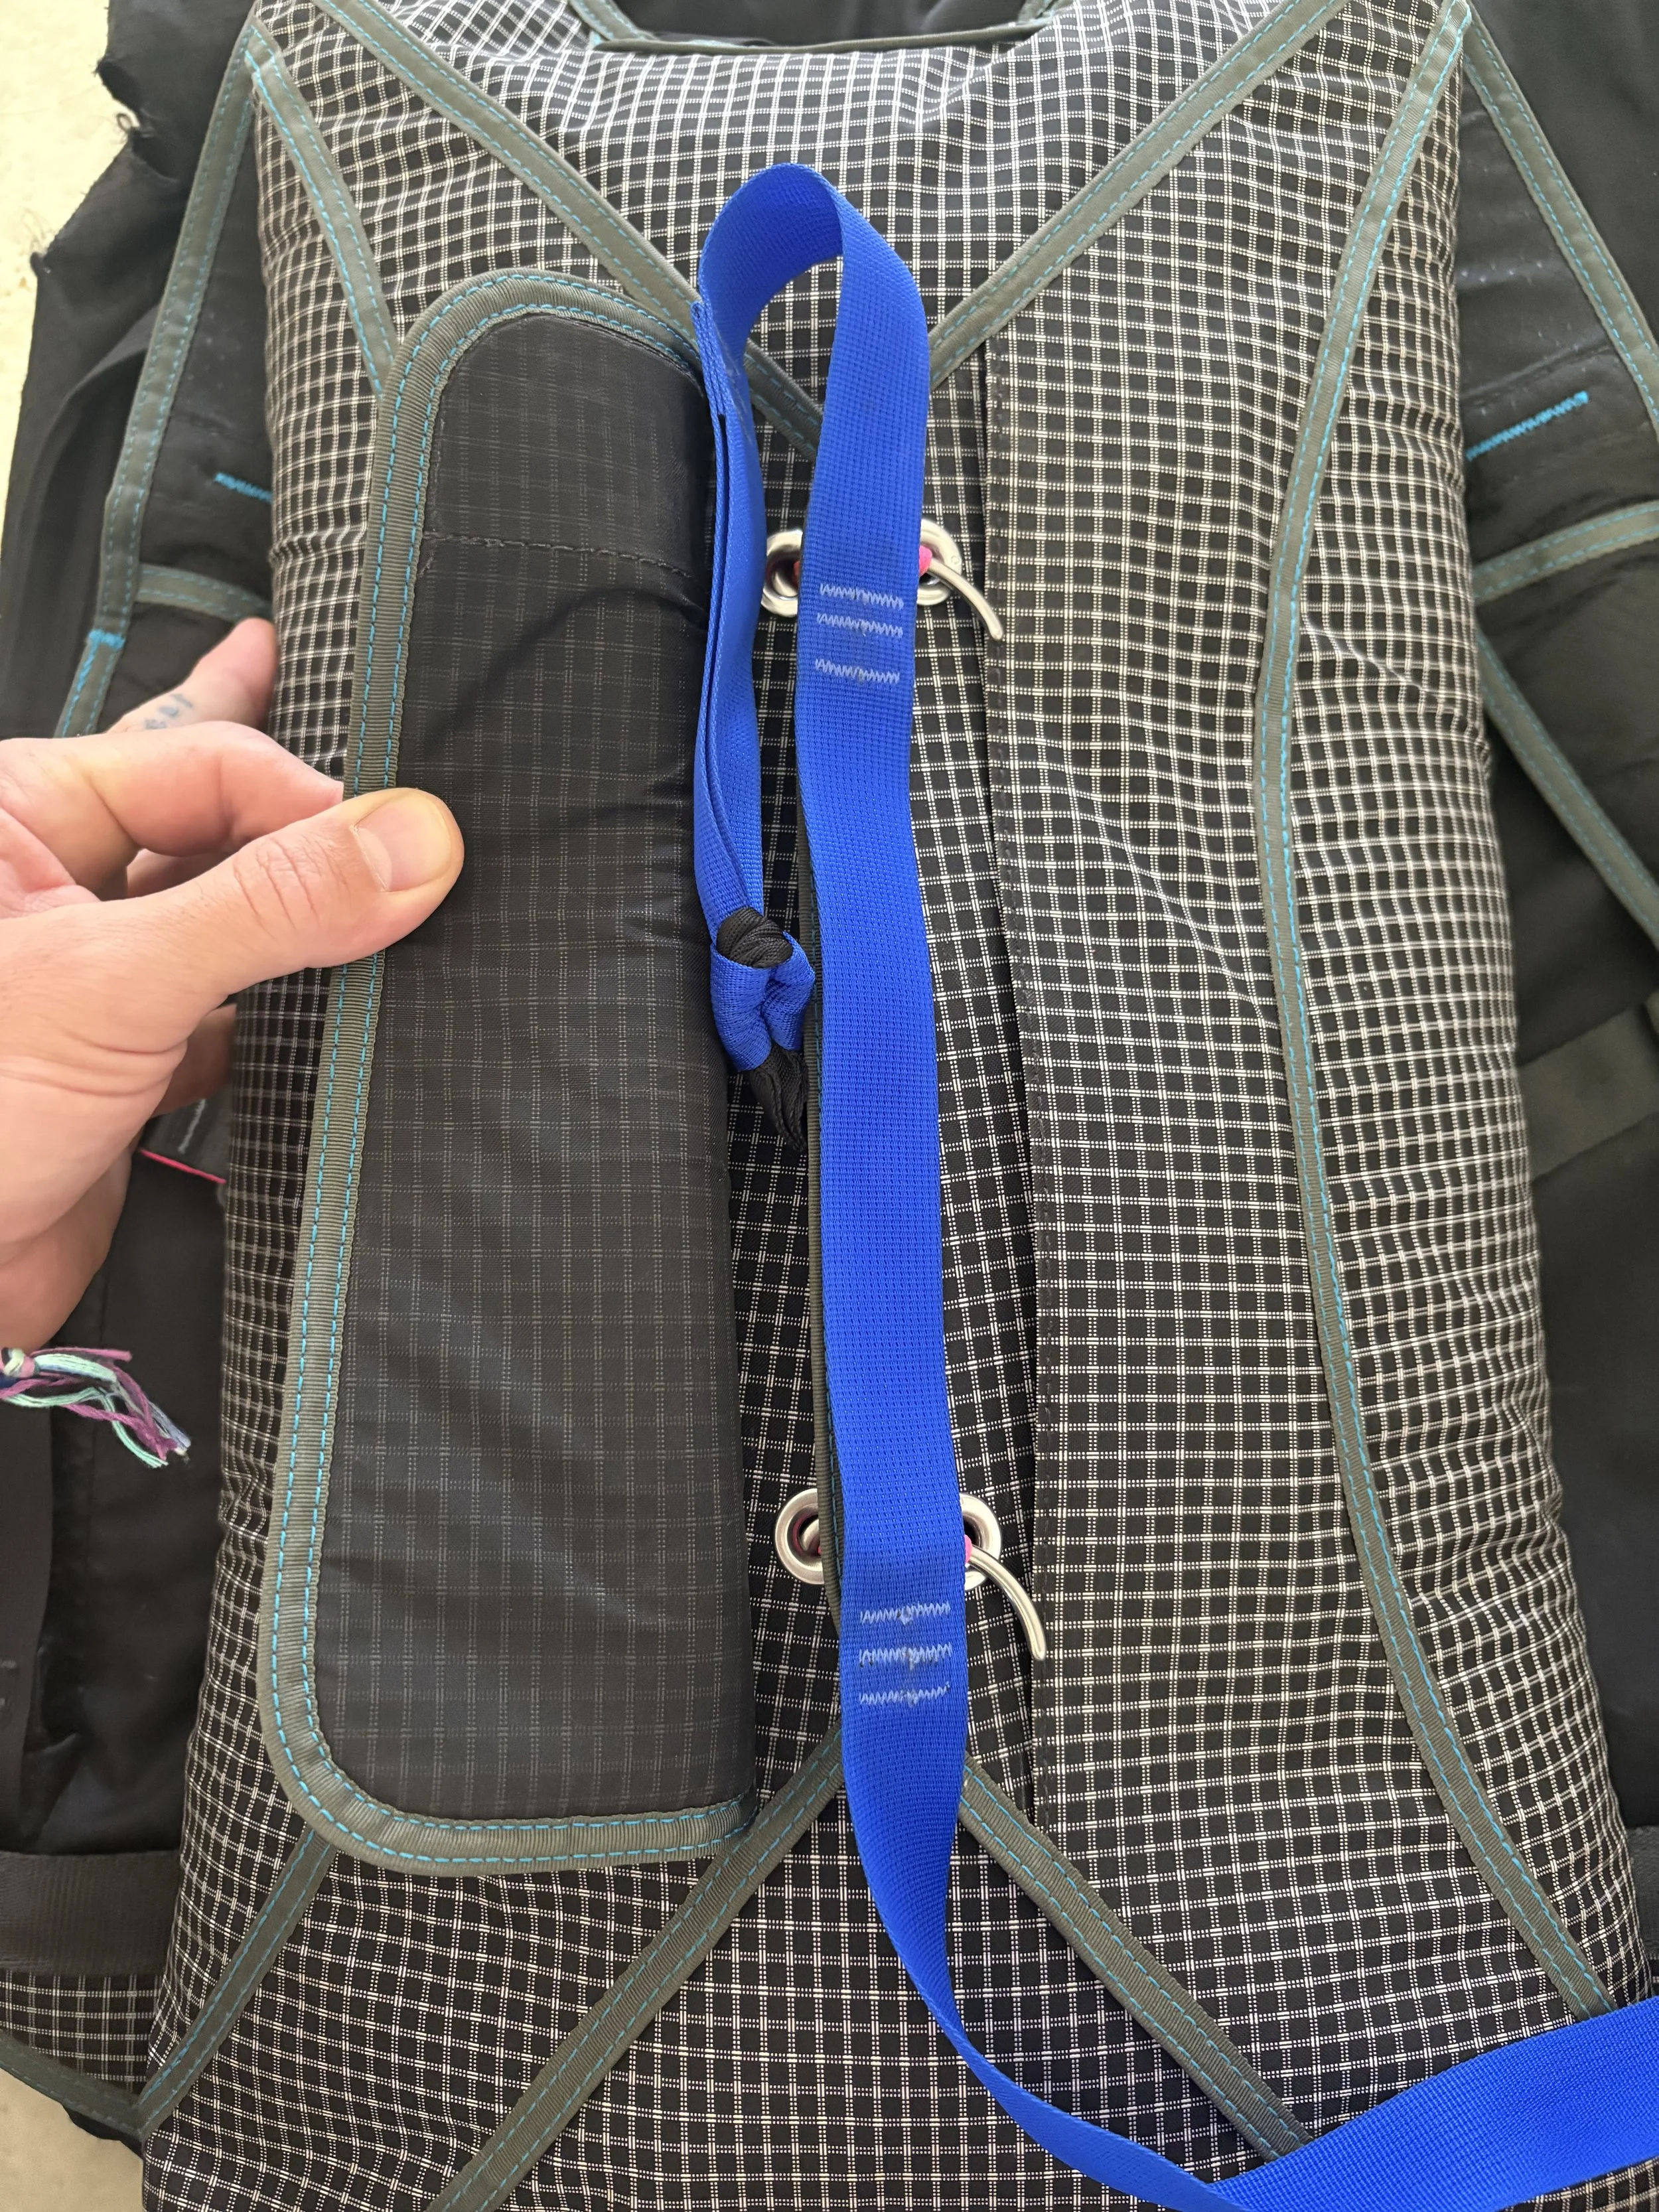
One of the most over-looked, and in my opinion, one of the most important tweaks you can do to rigging for low free fall, is shortening the length of your bridle. I am talking about the length of your bridle from your bottom pin to your pilot chute attachment point for this measurement. I have also minimized slack between the pins and between the top pin and canopy attachment point (Figure 1:2). I spoke with Jacob at Magic Backpacks a bit about this and the only really important thing here is that your pins have enough slack between them to pop independently of one another.
I’ve tested 9’, 7’, 6’ and 5’ bridles over the last couple years. After doing this for a while I settled on a 6’ bridle for all my SD rigs and a 5’ bridle for low free fall. While they certainly have a place in slider up jumping, I find 9’ bridals to be a bit excessive for most slider down jumping. Although I’ve done it, 5’ is a little short for me to be cozy doing aerials or big delays with, 6’ feels just right. I've used the 6’ for aerials, big delays, static lines and PCAs for hundreds of jumps with no issues thus far. The only time I occasionally find the 6’ annoying is on positive static lines and PCAs where more separation is nice before the extraction begins.
“But how can 4’ make that much of a difference?” you are probably thinking now. There are a couple of reasons I have found the 5’ bridle to be beneficial, the first being “tension” and pressurization. When pre-inflating, which I will cover later, the least amount of slack introduced to the system from when we release the pilot chute to full bridal extension, the better. Unnecessary slack allows more time for a perfect pre-inflate to roll (more on this in the Pre-Inflate Technique section) and lose pressurization. This means more time in free fall regaining pressurization and ultimately, lower openings. This is where I believe a simple 4’ can begin to compound significantly, and also why I haven't tested an inverted bridle routing. I don't have any desire to shorten my bridles further and an inverted bridle routing is going to re-introduce a lot of the slack into the system that you have removed by shortening your bridle.
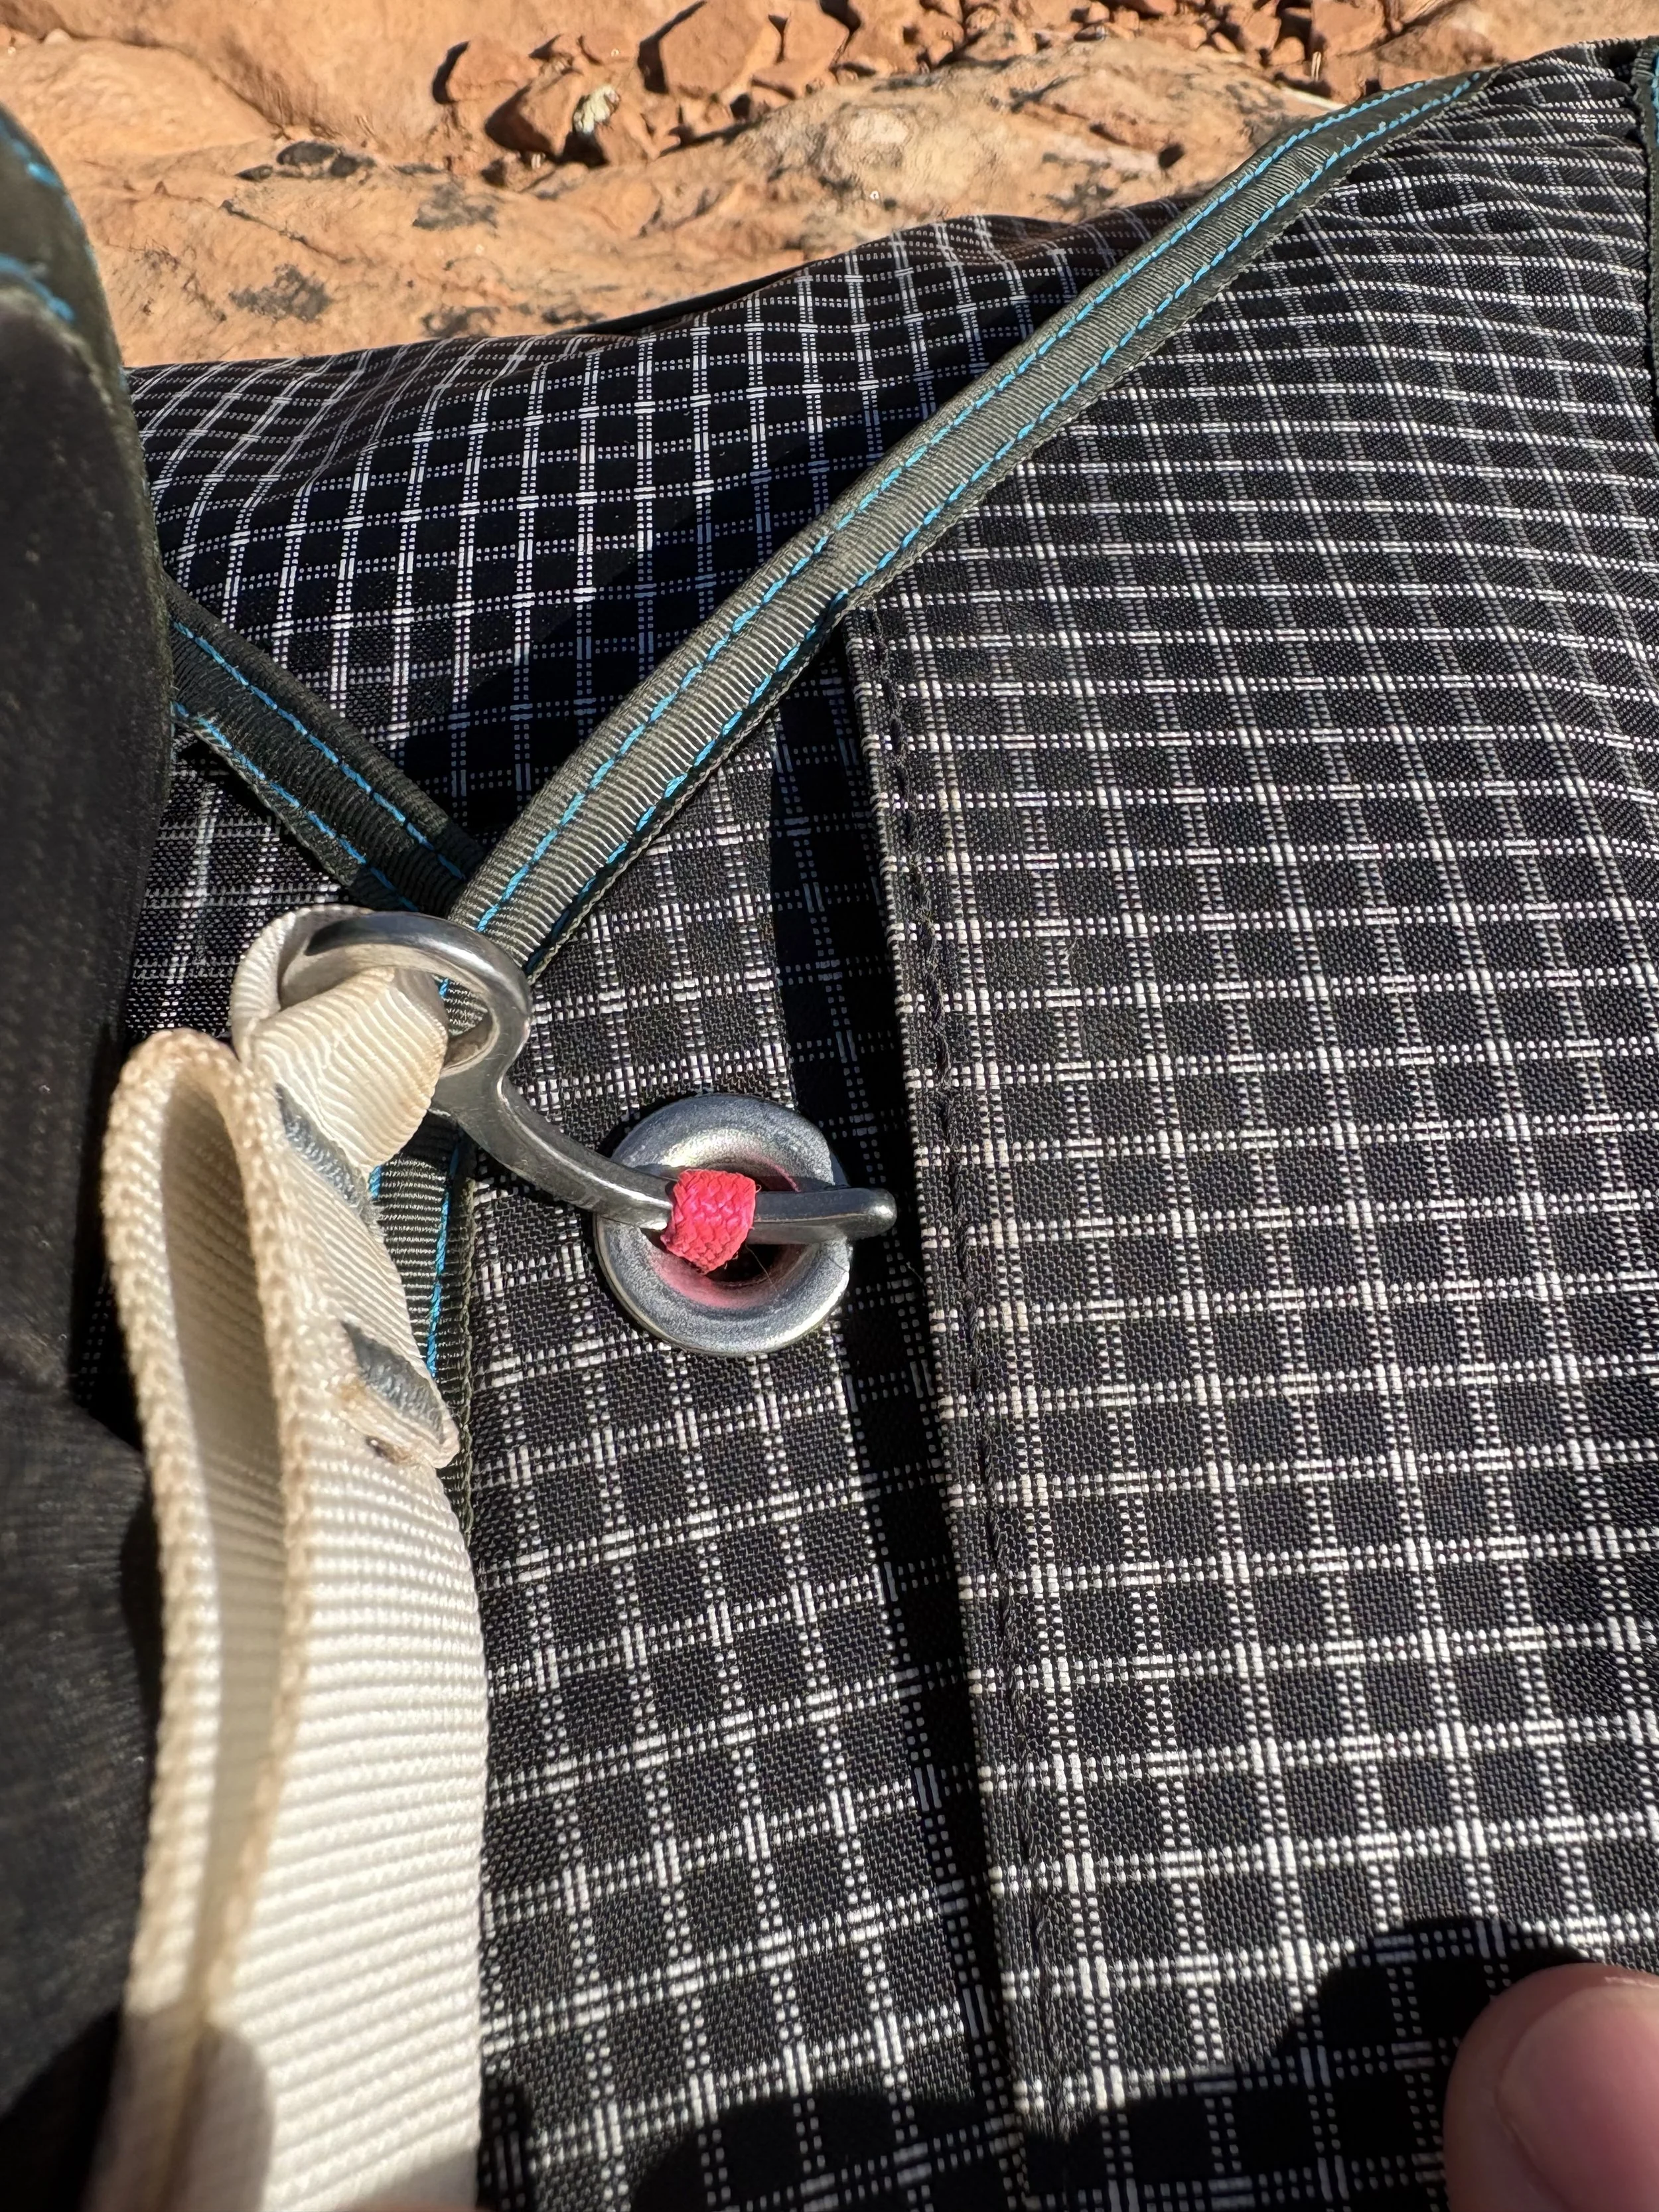
This leads me to pin tension. I rock pretty loose closing loops on all my SD rigs and my grommets typically have about an 1” of space between them. My loops still hold the pins snug but very little force is necessary to begin extraction. On low jumps, I prime my pins 70-80% of the way and leave them pointed horizontal (Figure 1:3). I haven't noticed much difference in orientation when they are this primed at such a low tension so I'm not convinced that it’s of much importance. Do what your container manufacturer recommends or what you're familiar with when it comes to pin orientation. John McEvoy is currently working on a cool study that is actually proving that pin tension might not be of the importance we think it is. At the very least, I’m certain I haven't had any serious issues with low pin tension and it makes me feel a lot better when I’m about to do a 120’ free fall.
“What pilot chute are you using?” This is easily the question I get asked the most, and probably one of the least important details until you get to sub 150’ free falls. Most decent 48” pilot chutes will get the job done, I used a Snatch 1 48” for quite a while. My go to is currently a custom 48” from Jacob Gardner at Magic Backpacks. The 50” Snatch 2 from Squirrel is also a solid option but it has a top vent and fairly supple mesh, features that aren’t my favorite on large pilot chutes designed specifically for low free fall. Without a nice updraft or headwind, I’ve found the 50” Snatch 2 more prone to subtle hesitations.
The 48” pilot chute from Magic Backpacks really shines for a couple reasons. Jacob uses a bulky mesh that causes the junction where the mesh and ZP meet to want to open, allow air in and inflate. I’ve found pilot chutes with more supple mesh can pressurize a bit slower and are more prone to small hesitations at low airspeed as air finds its way into the mesh and ZP. This is especially noticeable on weak pitches, pitches that are too aggressive or poor pre-inflates. Jacob also uses an internal trim tape in a manner that reduces internal volume or air necessary to maintain inflation, pressurization and stability. With these two things combined I have yet to experience a hesitation with this pilot chute. I tested a 52” from Apex briefly and found it almost too big to be effective. Even with a pre-inflate in good conditions, I struggled to get it pressurized enough on exit for it to be of any benefit. I only tested the 52” with a pre-inflate so it could be more beneficial for other applications or larger canopies.
Last but not least, let's talk about canopy selection. For low free fall that's sub 150’ I’ve grown to prefer more aggressive canopies, such as the Vision from Atair. When opening low to the ground it's nice to have forward speed for a few reasons. Toggle pressure to flare for a fast landing, control over your surge or an immediate correction, and more glide to get you out over higher terrain if that's an option. I've found the more aggressive canopies open faster and higher which is obviously what we want here. Newer canopies, in terms of wear, also tend to yield higher openings than that old, clapped out UL you bought off marketplace this winter.
I load my low free fall setups pretty lightly at around .59-.62. There are a couple of reasons for this. The first is that I find a lower wing loading more comfortable in Moab, especially on more aggressive canopies. The second being that I think this is actually the sweet spot in wing loading for low free fall at my body weight, 150-155 pounds. Let me explain. I initially thought a smaller canopy with shorter lines and less material would yield higher openings, and this is true to a degree. While your line stretch and inflation numbers may be higher, the number at which you begin to hit 1:1 glide can start to be impacted in a negative manner. I believe the reason for this is that at a higher wing loading, you sink out a bit faster between inflation and clearing toggles. You typically will also have a bit more of a recovery arc you have to control. I haven’t tested this extensively as Moab isn’t really the place for a high wing loading, but this has been my findings from a handful of jumps at a slightly higher wing loading.
I pack in deeps for all of my low jumps on every canopy besides my OSP2, which I pack in shallows due to the already slow and sinky nature of it. I don’t use custom deeps, I use factory deeps. I don't have enough data in consistent conditions to prove this and it's likely marginal, but I think the slightly higher angle of attack being packed in deeps provides the ability to catch more air and in turn, speeds up the inflation process. My openings in deep brakes on low jumps have felt snappier than shallows every time. I haven't tested spectra lines for low free fall yet because I don't do much slider up jumping, nor do I currently want to invest in a canopy I can limit to only low jumps, but this is definitely something I am keen to test and explore eventually as I think it could be beneficial.
One thing that often surprises me is how few people ever adjust the length of their control lines. They get a canopy, hook it up and never touch the control line length. I've convinced a number of friends to adjust them and they were blown away by the difference. If you're someone who has never adjusted the length of your control lines, maybe hold off on the low free fall for a bit and spend some time playing with that.
I rock short control lines at the cost of front riser performance and glide on my low free fall setup for a number of reasons. Of all the important characteristics a BASE canopy can have, specifically in a low free fall scenario, I find front riser performance to be the least important. Sure, it's a blast to rip terrain on fronts or swoop a fun line into the landing area but front riser performance isn't what keeps you alive when shit hits the fan. If sick swoops are your goal, your mind is going to be blown when you find out about skydiving canopies and paragliding wings.
On a lot of these low jumps, in the event of a 180, you aren't going to have the altitude for a full correction. Your goal will likely be riding the wall down as soft as possible, sinking it into the base of the wall, or maybe having enough altitude for a small correction to avoid hitting the wall and a fast landing in the talus. A shorter toggle stroke can give you more control in all of these instances, I like to have my stall point somewhere around my chest to mid abdomen. These are just a few great examples of why it's important to be dialed before pursuing low jumps and even then, none of us are immune to negative outcomes. There is nothing wrong with taking the static line, getting a better sight picture for visualization and coming back for the free fall when things feel 100%.
Conditions
Unfortunately a lot of low jumps, specifically low free falls to flat, are going to be highly condition dependent. Ideal conditions are a low density altitude (Local AWOS can be better than nothing if you don't have a way of measuring this yourself), a clean updraft that isn't being induced by crosswinds, cool and crisp temps (Not cold and sinky, not hot and thermally. Just cool, dense, usually early morning, air.) and sun just hitting the terrain and wall under the exit you are jumping. I try to avoid hot and thermally impacted terrain that's been baking in the sun all day. Most of my low jumping is done in the early morning late spring through early fall. Sometimes the direction of the exit requires an afternoon jump for sun to be on the terrain under it. In that case I look for cooler days or evenings in the forecast to go to that exit.
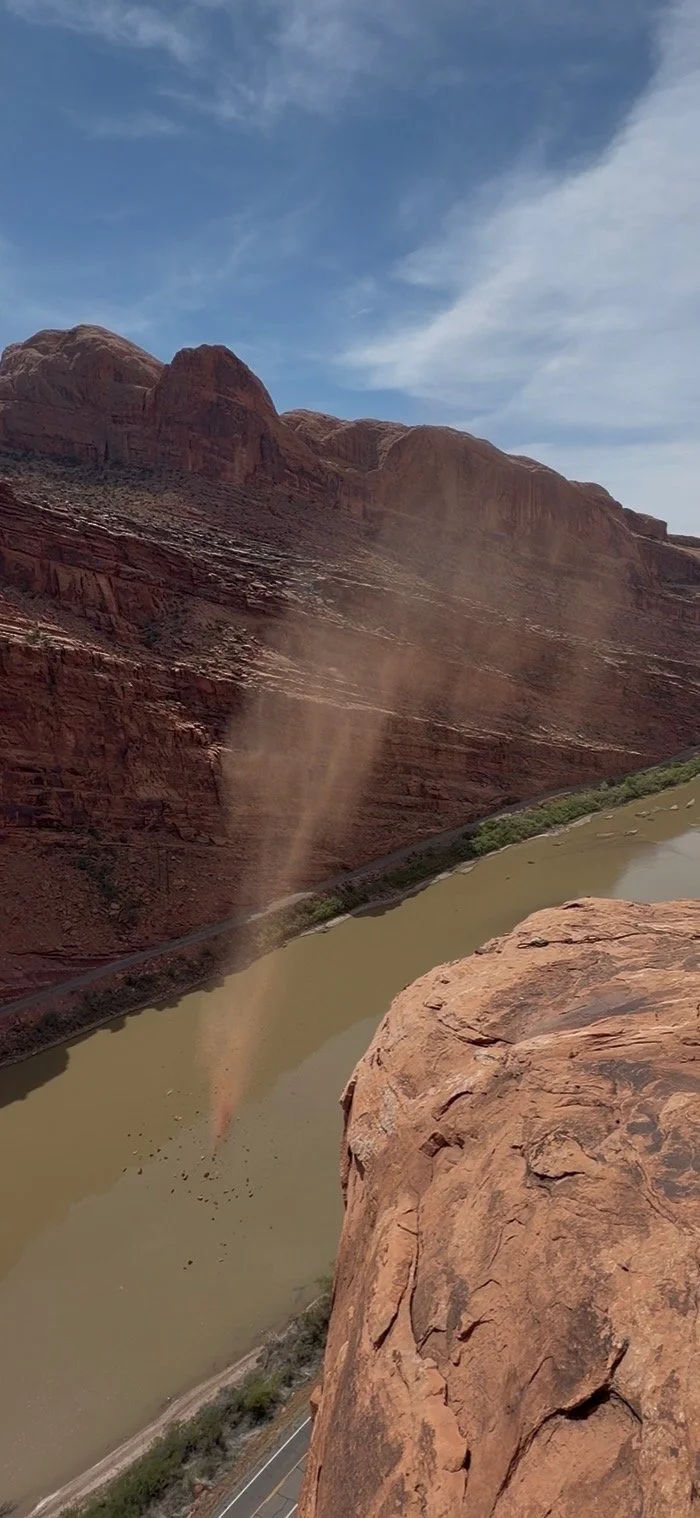
A light headwind can make up for a lack of updraft, but keep in mind that in the event of a 180, a headwind is now going to be a tailwind and push you at the wall faster. A crosswind induced updraft is less than ideal but can work well enough depending on the strength and direction of the crosswind, surrounding terrain and quality of opening airspace. A crosswind that is wrapping around a wall, over trees, or other obstructive terrain can create nasty rotors and is definitely not the clean air we are looking for to pre-inflate. Sand, dirt or dried vegetation tossed over the exit can be a great indicator for what the wind is doing at exit (Figure 2:1). I prefer this over spit or water when I’m about to pre-inflate.
Pre-inflates are very easily influenced by crosswinds, this means your heading performance will be affected as well. The combined factors of almost no airspeed at the time of your pilot chute being released and the entire volume of your pilot chute being exposed to the crosswind allow it to be pushed to one side or the other and typically remain there throughout the entire extraction process. I almost always open into the direction of the wind on low free falls in a crosswind. This is why it's important to have a wide, clear opening airspace and landing area if you plan on pre-inflating in anything less than perfect conditions.
Pre-Inflate Technique
I have to start this section with a HUGE shoutout to Mike Koser. Mike took me under his wing when I first started coming to Moab. He showed me around a ton of different exits, got me a job, convinced me to move to Moab and eventually taught me how to pre-inflate for lower free falls, something he had been working on and dialing in before I even started jumping. Mike did most of the hard work for me, I just picked up where he left off. I certainly wouldn't be where I am today, or doing the jumps I am, if it wasn't for the help and generosity of Mike.
In ideal conditions with a dialed setup, a well placed pre-inflate tends to yield consistently higher openings than any of the other pitch methods I have tested. In the “Gear Selection + Rigging” section I talked about pilot chutes with supple mesh, hesitations because of this, and air finding its way into the pilot chute. When pre-inflating, we are essentially eliminating one more step that the pilot chute would need to do otherwise and minimizing the chance of the aforementioned issues by getting it pressurized and inflated by the time we exit.
One of the most important things to remember when you begin learning to pre-inflate is that we are “placing” our pilot chute, not pitching. Trying to pitch a well pre-inflated pilot chute won't usually do much besides reduce the efficiency of your pre-inflate. I’ll get back to “placing” a pre-inflate after we discuss a couple of other things.
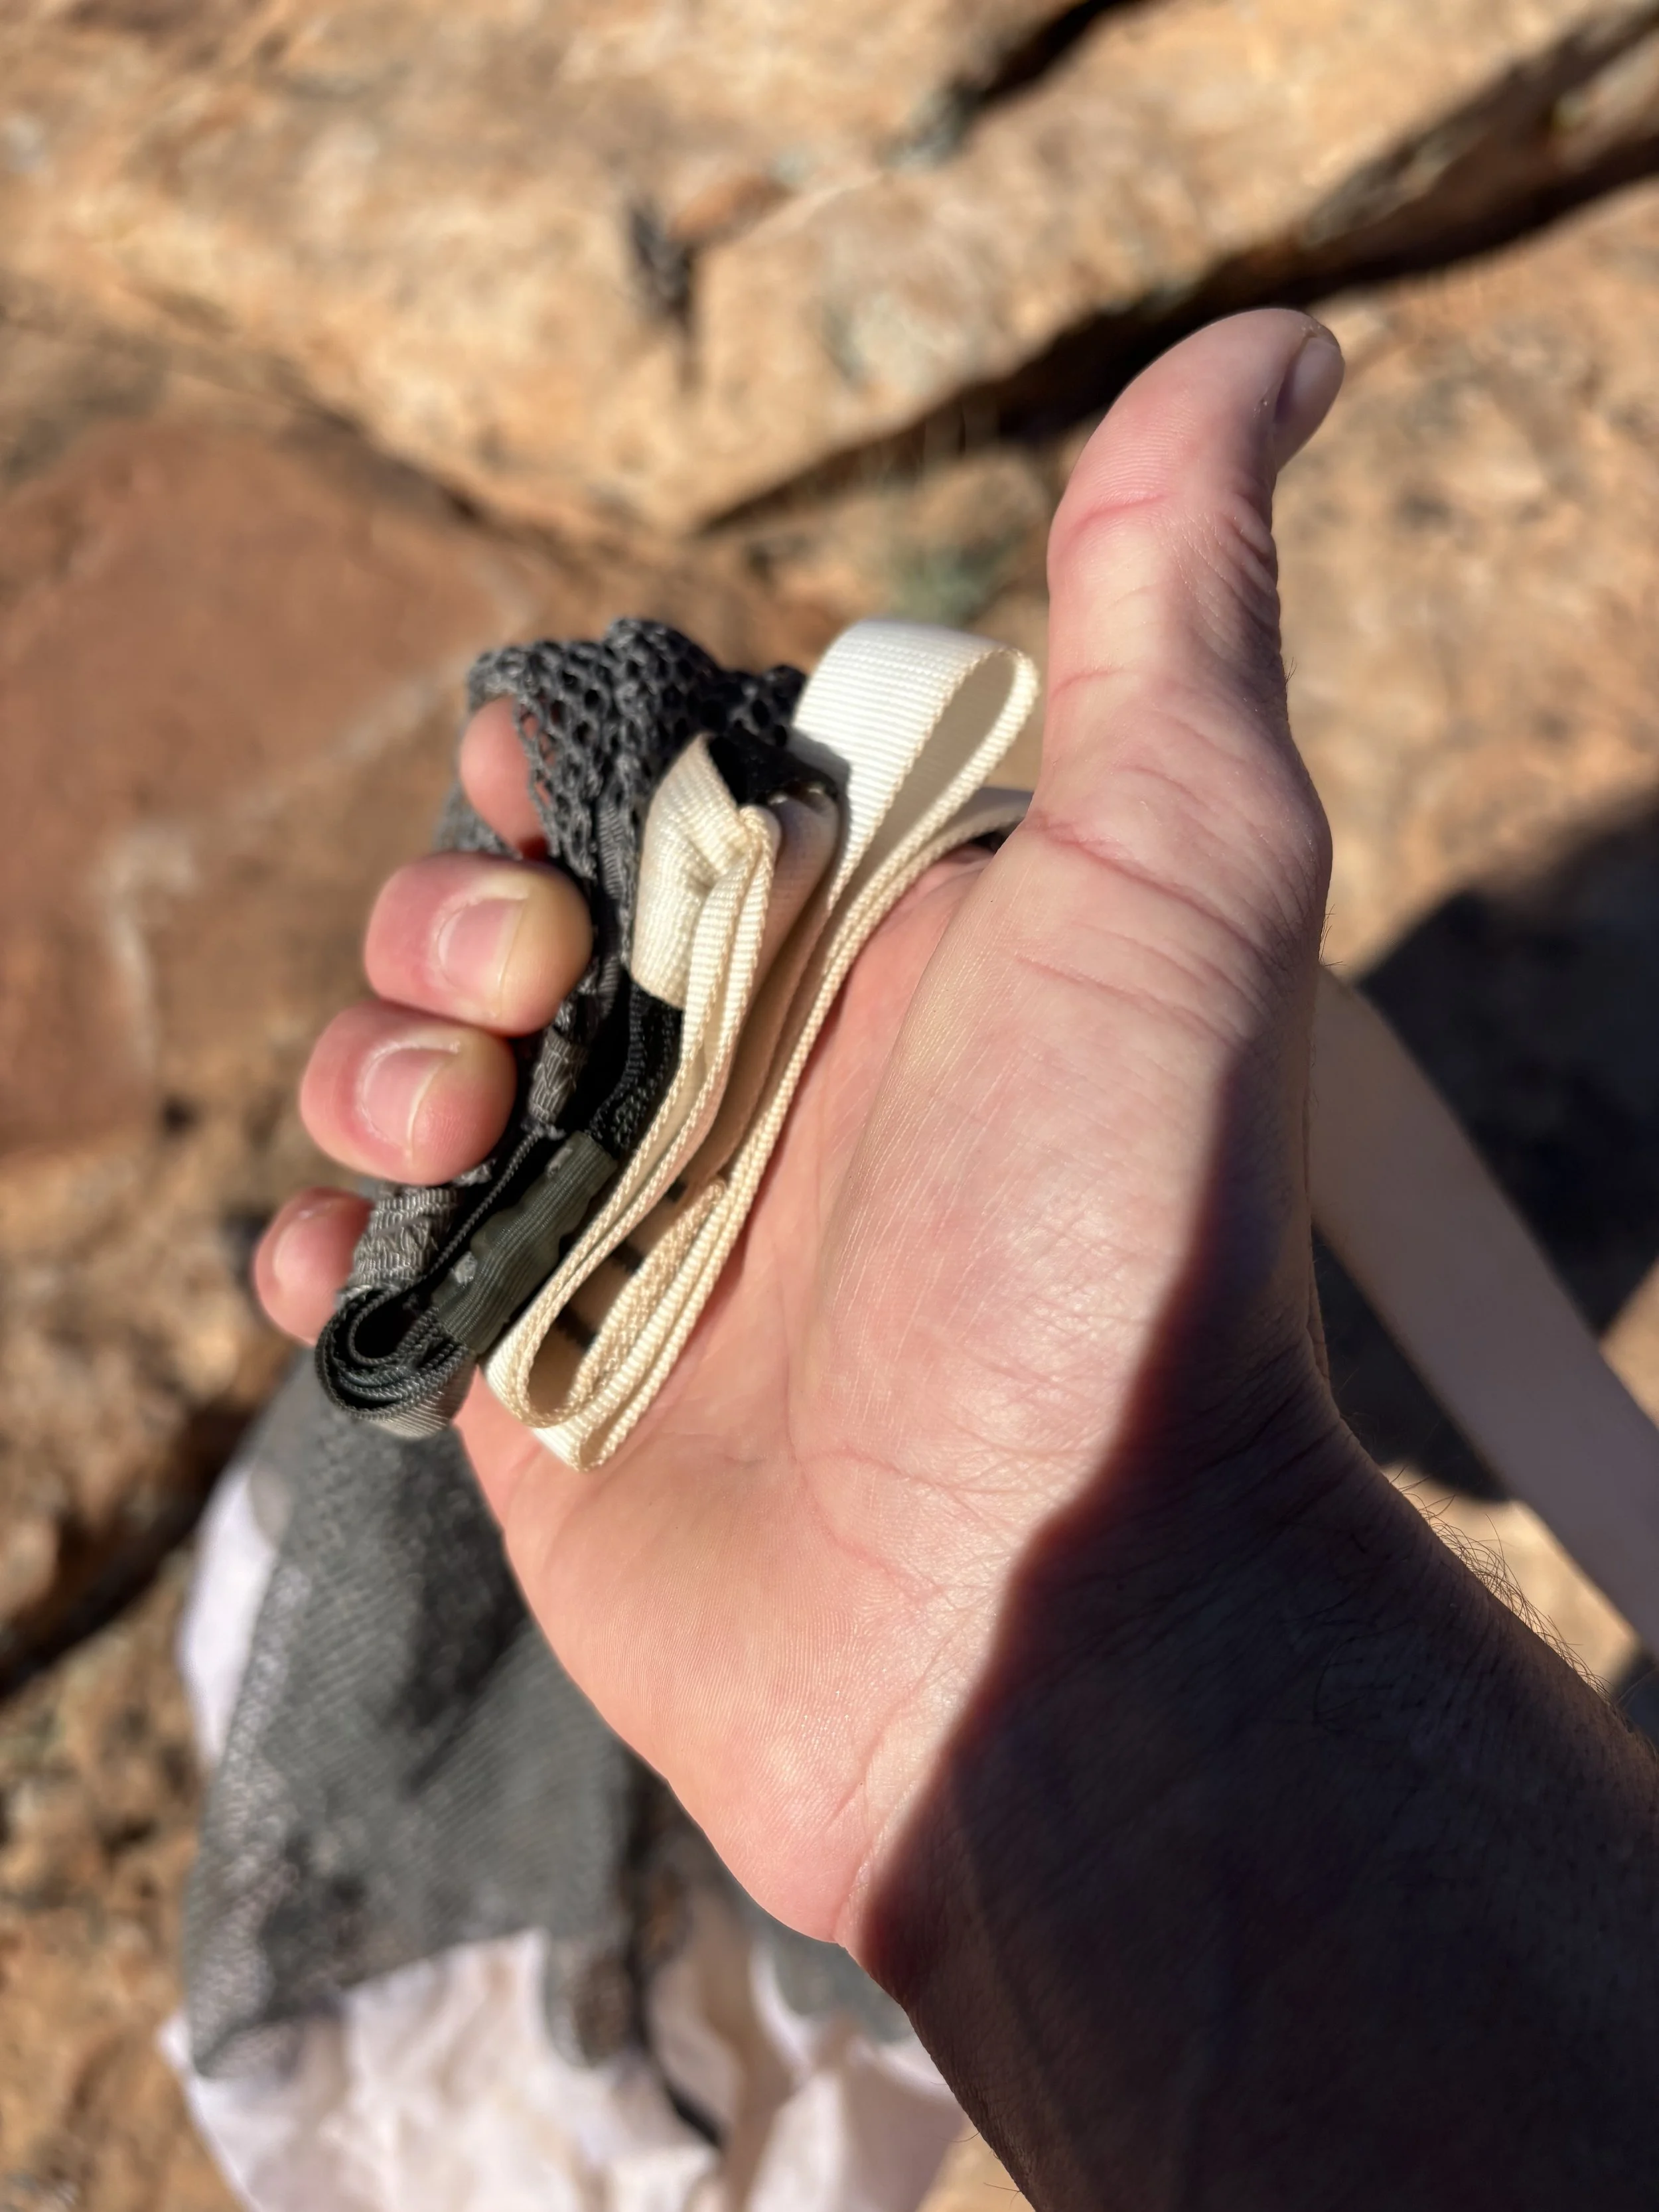
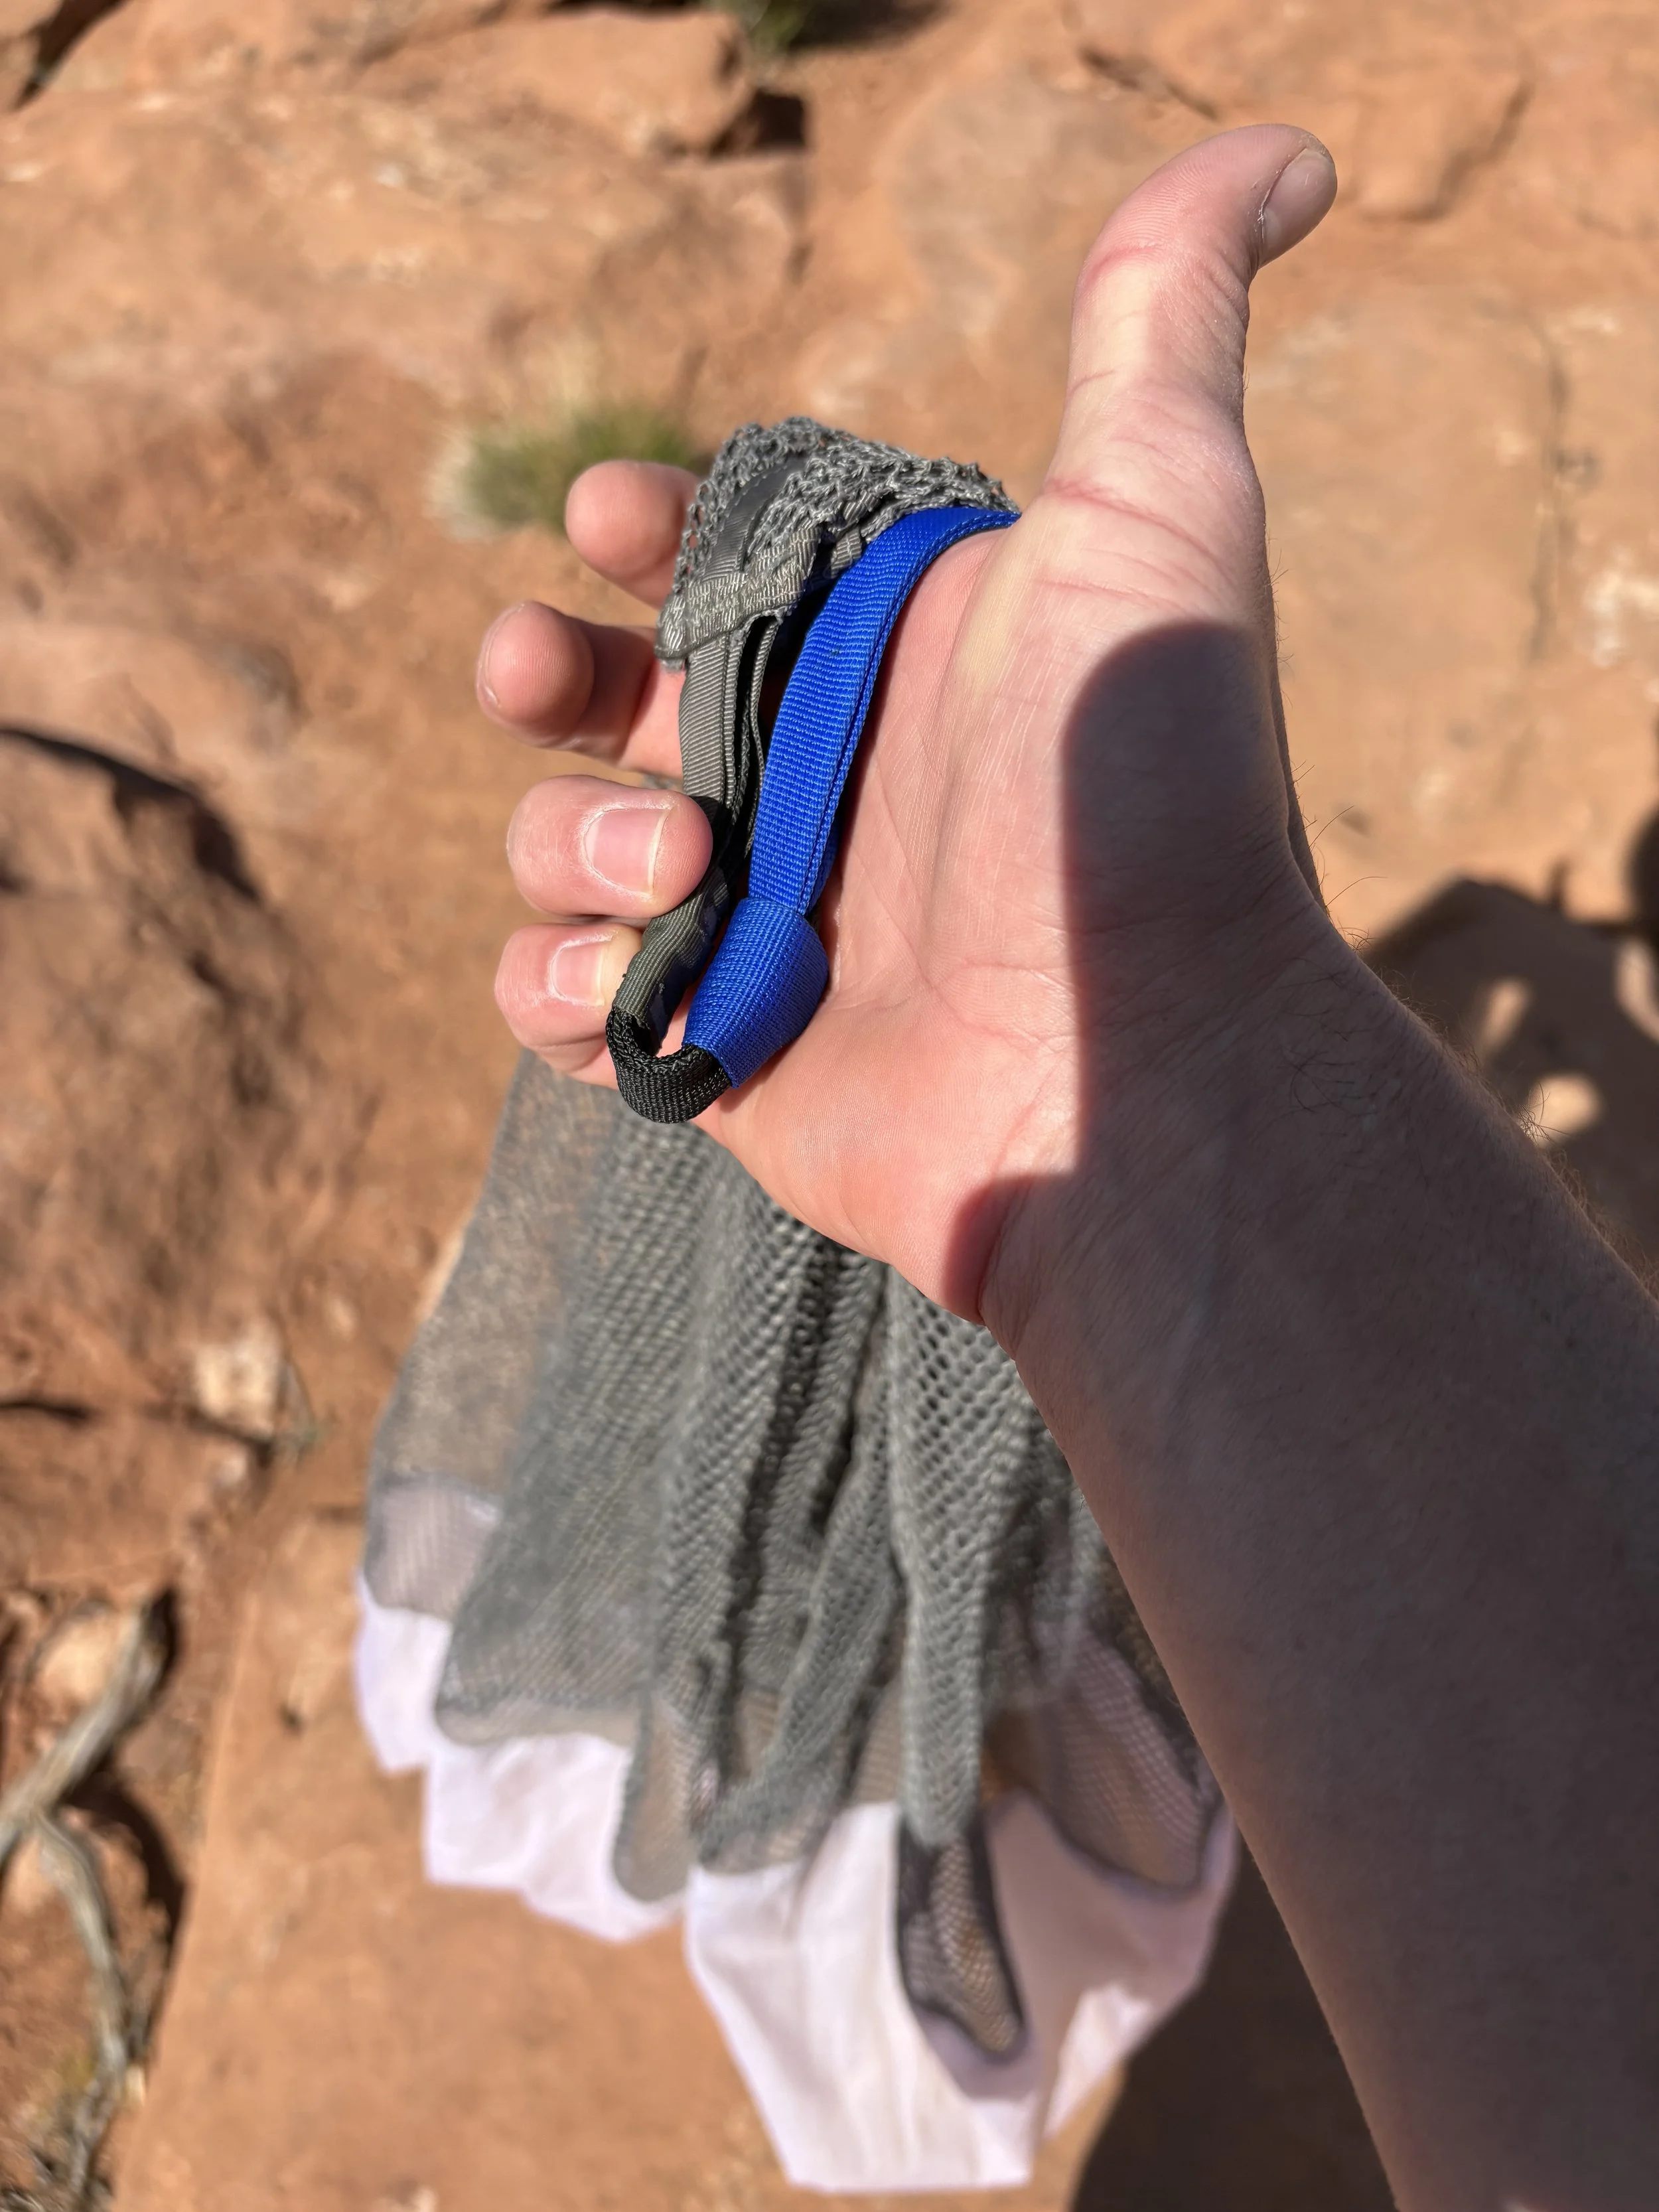
Setting up a pre-inflate is pretty straightforward; s-fold your bridle into your hand like you would for a normal handheld (This is about 2-3 s-folds with a 6’ bridal, my 5’ puts the attachment point directly in my palm from my magnet with no s-folds necessary.) (Figure 3:1 and 3:2) and then your bridle attachment point and only a couple inches of mesh, the majority of your pilot chute should be hanging out of your hand. I make sure to keep any excess material in the s-folds tight, neat and not sticking out of the top or bottom of my hand. Once I’m here, I make sure my mesh and ZP aren't twisted up as this can restrict airflow into the pilot chute and lead to a poor pre-inflate, and give the pilot chute a couple “fluffs” like you would after cocking the pilot chute on a skydiving rig. The more open the pilot chute is, the easier it will be to get a proper pre-inflate.
When I first started to experiment with the pre-inflate, I imagined the bigger and better the runner, the more powerful the pre-inflate and in turn, higher openings. What I have actually found to be true is that in ideal conditions only a few strong steps are necessary for an optimal pre-inflate, too long of a runner can actually hinder pre-inflate performance. I believe the reason for this is that we can run fast enough to inflate a pilot chute but not fast enough to allow it to fully pressurize it evenly. This can result in the pilot chute oscillating in our hand while we run before we place it. This will often cause the pilot chute to roll to the side a bit after we place it, typically behind you which is the last thing you want. The rolling motion allows the pilot chute to dump air, lose pressurization and take up valuable time and altitude as it finds its way to bridle stretch and inflation. Now you essentially just have a really inefficient go and throw low to the ground. I personally avoid poised low free fall like the plague unless conditions are mint. I've found it much more difficult to get a solid pre-inflate, separation is minimal, and I believe the forward airspeed you generate with a runner can encourage better heading performance during low airspeed deployments.
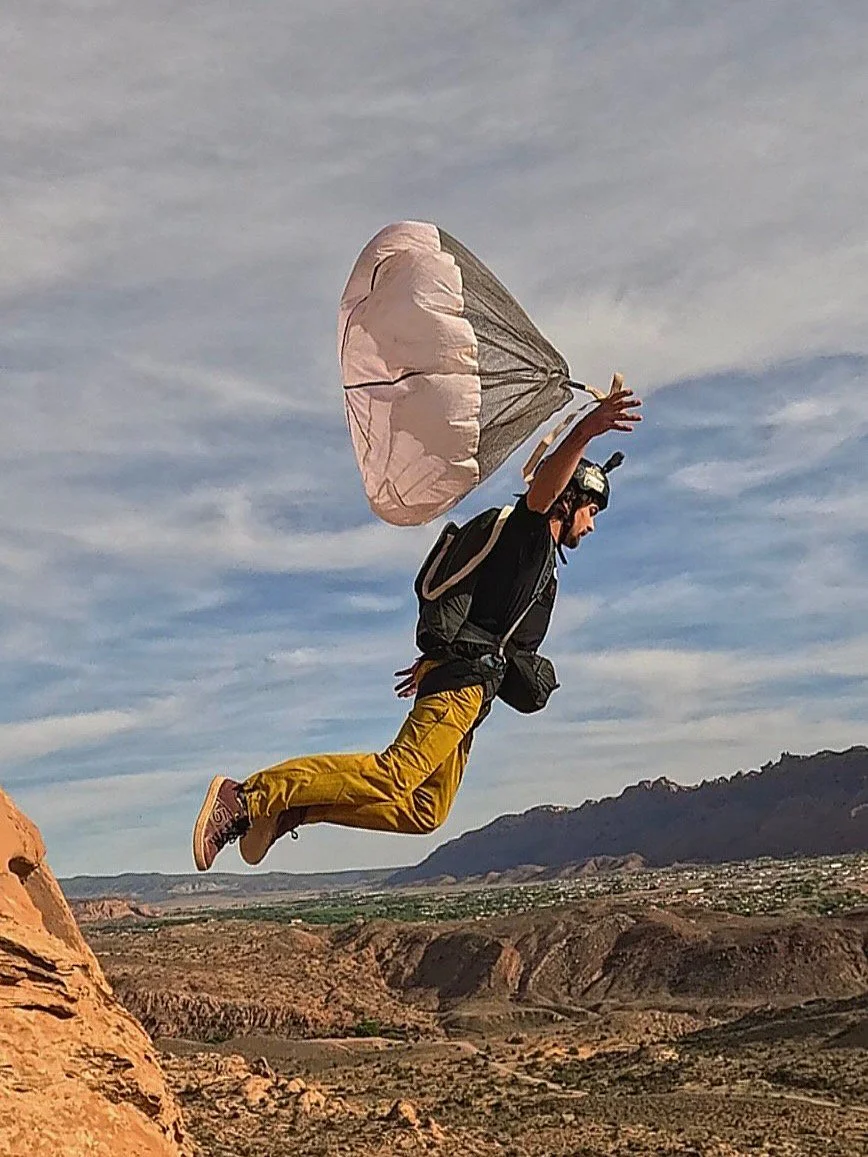
You’ve probably been wondering exactly what I mean by placing your pilot chute so I’ll cover that in a bit more detail. I used to run with my hand up and pilot chute in the place I was planning on releasing it but found this more prone to the oscillating and rolling I mentioned earlier. If I don't have a headwind or updraft present, I will sometimes still do this. What I generally do now is hold my pilot chute down and out to the side slightly, and as I’m taking my final step/push off of the exit I bring my pilot chute up to a 45 to 60 degree angle off of my shoulder at a full arms length and release the pilot chute as I feel it fully inflate and pressurize. In a perfect scenario, your foot leaving the exit and pilot chute leaving your hand are happening simultaneously (Figure 3:3). It can be necessary to hold onto the pilot chute a split second longer if you don’t feel it pressurized in your hand, releasing too early can also allow the rolling I talked about earlier.
As soon as you feel pressurization in the pilot chute, let go. Holding onto a large, pre-inflated pilot chute will pull you off axis and ruin a beautiful body position fast. FLY YOUR OPENINGS!!! Don’t scrunch up and reach for your risers immediately. Relax, enjoy the visual and wait to get stood up in the harness before you start grabbing for toggles or risers. Depending on the individual and the gear being used, reaching for risers immediately after your pitch can deform your body position, actually add a little bit of tension to your closing loops, and potentially delay your extraction process at low airspeed. Flying your openings puts your hands in a better position to get to toggles quickly and prevents injuries to your hands and fingers. I've ripped off nails and jammed fingers reaching for risers too soon. Neither of these are things you want to be worried about when you have 5 seconds under canopy to land safely. \
Headspace
While it's important to have healthy outlets to clear our minds, it's also important that we don’t let our emotions cloud our judgement and justify poor decision making. Plenty of us joke about “Sad Boy BASE” but at the end of the day, the only people that are going to be feeling sad if you go in are your friends and family. Maybe you didn’t sleep great, are dealing with relationship issues, stress at work or life issues in general. I’ve watched life issues and stress turn some of the most conservative jumpers into the most rash decision makers.
One of the hardest things we can do as jumpers is know when we need to chill, take a beautiful day off, and invest our energy somewhere else. I'm not saying don’t do the things you love, because your idea of “chilling” could be going out to a big, familiar exit with friends. I’m saying save the hectic dream jump for a day when you are well rested, clear minded and as close to 100% as possible. Presence equals performance in BASE and if your mind is elsewhere when you're on exit, you can never expect yourself to perform at your highest level.
Ego. Some embrace it, others do their best to dissolve it. Either way, I find little place for Ego in BASE. In today's day and age, it's easy for motivations and desires to become convoluted with countless social media platforms at our fingertips that can provide instant dopamine hits. If you can't do a jump without posting a video and your motivation for pursuing low jumps is coming up with a catchy caption and hoping people tell you how sick you are, you might be in it for the wrong reasons. These jumps should be for you and only you. I’m not saying you shouldn’t share them or that you can’t be proud, rather that the motivation for these jumps should be something deeper than a surface level approval from others. Ego is something best left at the car when you begin your hike to the exit.
Conclusion
I did my best to relay all of this information in a clear and concise manner but there's a lot of information here and even more I could cover. A video will be made and released with a lot of this info and hopefully more in the coming months. If low free fall is something you decide to pursue and you have any questions I didn't cover here, please feel free to reach out! My goal here isn't credit or recognition, but rather helping others pursue a relatively unexplored area of BASE that has brought me so much joy over the last couple of years as safely as they can. Throughout this process it's important to remember lower and lower doesn't always have to be the goal. The information in this article can be used to give yourself more options on exit, more separation on two-ways and more margin on jumps than a traditional go and throw will typically offer.
Everyone knows a camera is an unnecessary snag hazard but there's no denying how useful of a tool a 360 camera can be for debriefing your pitch, pilot chute behavior, opening characteristics and body position. That being said, I see a lot of people more focused on their camera on exit than they are on gear checks or visualizing their jump and herein lies a problem. Sure, memories are a blast to have, be able to look back on and share with others but if you're worried about “Is my camera on?” or “Will you record this?” and you haven't even peeked over the exit, looked at the LZ or considered your outs in the event of an off-heading, maybe take a minute to step back and reconsider your priorities.
The margin we build beforehand is what makes these jumps repeatable. A lot of these exits won't be something you walk up to and free fall right away and that's okay, they should be earned. If you have a low free fall goal in mind, static line it as much as you can first. Laser the exit, laser the terrain, compare those numbers to your free fall numbers and overlay gps lines from your Flysight on Google earth. This will help you develop a better sight picture, aid your visualization and hopefully allow you to ace the free fall when the time comes. Stay safe out there, have fun and remember, that dream exit of yours isn't going anywhere!
Reference Photos
Links
Ackowledgements
This section was honestly the most difficult for me to write because of the overwhelming amount of help and support I’ve received over the last few weeks getting this all together, as well as over the last couple of years learning all these things. Mentioning all of you could be another article in and of itself so here are just a few people who have been impactful not only with writing this article, but throughout the last couple of years in BASE.
First and foremost, JP Stutjick for teaching me to skydive and BASE jump. Mike Koser, again, for taking me under his wing early on and showing me around. This meant the world to me after a year of lots of solo jumping as a newer jumper. Andy Lewis for all the unforgettable missions, letting me pick his brain with endless questions early on, sharing his knowledge of BASE, being a voice of reason (crazy, right?!) when my visions may be a little too hectic, helping put a fresh canopy over my head when my rig was getting a little too well loved, the proof reads and suggestions for the article and consistently getting me peaked and out of my comfort zone. John McEvoy for all he has done for BASE education, inspiring me to get this going, proof reading and offering great suggestions to add to the article. Jacob Gardner for countless discussions about gear, rigging, testing, history and making me a PC that pulls like a John Deer. Taz for not only giving me a place to publish this article, but also reading this over and over and over again, and giving me an endless amount of great feedback on how I could refine and polish the super rough draft I started with into what it is now. Last but not least, my Dad for all his help with proof reading and edits on this article, as well as believing in all my crazy ideas over the years no matter how much they have terrified him.
This list could go on forever but you all know who you are, I’m grateful for you and love you all!!!